Guide to Install TWRP Lenovo A6000 without PC.
Root Lenovo A6000. Today's guidebelajar will share to you about how to perform the root on an Android smartphone device. Now I will explain how to install TWRP recovery on Lenovo A6000. this device comes with Android OS, v4.4.4 (KitKat) and supported with Chipset Qualcomm MSM8916 Snapdragon 410, Processors Quad-core 1.2 GHz Cortex-A53, GPU Adreno 306, 1 GB of RAM as their engine. An additional feature is the main camera with 8 MP and secondary camera 2 MP will give you good experience to take any picture.
Make sure to always take backup all your important data like music, video, SMS, a document stored on internal phone memory. (see this guide) and other data to the other resource outside of Lenovo A6000 / device, and make sure your battery is fully charged or at least there is 80% of power on it before you continued to proceed.Guide Flash Lenovo A6000 / using SP Flash Tool.
- Make sure your device is Lenovo A6000 because this guide is intended just for this device.
- Your Lenovo A6000 must Rooted, see this guide to root your Lenovo a6000.
- Then download TWRP recovery for Lenovo A6000
- Kitkat TWRP (select this TWRP if your Lenovo A6000 using OS KitKat 4.4.4)
- LollipopTWRP (select this TWRP if your Lenovo A6000 using OS Lollipop 5.0.2)
- Put recovery on your SD Card.
- Then download and install Flashify from Google play store to your Android device
- Once installation complete, run this flashify
- On screen you will see Root Authorization,

flashify - root authorization - Just select Allow
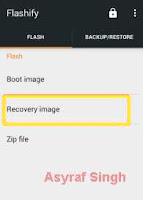
- Now select recovery image

flashify - recovery image - then select choose a file.
- Browse your file on SD card, and find your TWRP recovery image
- Once ready, you will see confirm window on your android screen. Select Yup

flashify - flash recovery - Once flash process is complete, you will see a message on screen. Just select reboot now

flashify - flash complete - Finish.
http://www.mediafire.com/download/8d8ggsvnlnpocl7/TWRP_Kitkat_A6000.imghttp://www.mediafire.com/download/o3uwiop608iedbp/TWRP_Lollipop_A6000.imghttps://play.google.com/store/apps/details?id=com.cgollner.flashify&hl=en |
| flashify choose a file |
ليست هناك تعليقات:
إرسال تعليق