السبت، 30 ديسمبر 2017

Guide to Install CWM and TWRP Recovery on Android Smartphone Without PC.

Guide to Install CWM and TWRP Recovery on Android Smartphone Without PC.

Install CWM and TWRP Recovery. On this guide we will learn together how to install a recovery on any android device. You can find a lot of custom recoveries available and ready to install on android device, but today most popular recovery are ClockworkMod Recovery (also called CWM) and TWRP (TeamWin Recovery Project). There are three methode you can use as a standart methodes to install custom recovery on your Android smartphone devices. First, we can use ROM Manager or GooManager. second, we can use Fastboot. third, using flash image. You can decide which the easiest method to install custom recovery on your device.


Before we go to the next step, we must know what is the different of CWM and TWRP recovery. So, you can easy to decide what recovery should be used when you want to flash or install ROM on your device. CWM or ClockworkMod Recovery has been developed by Koushik Dutta (Koush), By using CWM recovery you will be able to perform several advanced recovery, installation, maintanance system, backup and restoration on your Android device which this is not possible you did on the stock recovery. And sometimes it's most common method used to gain root access to your android system, install custom ROM's, Install new kernel, install themes and mods.

And now, what is TWRP (TeamWin Recovery Project) definitions ? This recovery is a fully touch-based custom recovery that was initially developed for Nexus devices, But now TWRP recovery has been made available for countless other android smartphones and tablets as well, and it's avaliable in official or third party.

On this guide guidebelajar will show to you step by step guide to install CWM and TWRP Recovery on Android Smartphone Without PC. You can follow guide below to install it on your Android device.

Guide to Install CWM and TWRP Recovery.

  1. Your android device should on WiFi area coverage.
  2. Make sure your android device has been rooted.
  3. You must download and install ROM Manager Apps.
  4. * For free use download here 
    https://play.google.com/store/apps/details?id=com.koushikdutta.rommanager
    * For premium use download here 
    https://play.google.com/store/apps/details?id=com.koushikdutta.rommanager.license
  5. Then open this App, on main screen you will see recovery setup.
    Install CWM and TWRP Recovery
    Install CWM and TWRP Recovery
  6. Under Install update recovery, you can select which custom recovery want to be installed on android device. There are two option on it.
    • ClockworkMod Recovery (CWM)
    • Team Win Recovery Project (TWRP).
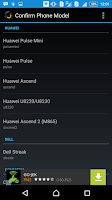
  7. When you finished select the custom recovery, now confirm your phone model
    confirm your phone model.
    confirm your phone model.
  8. Here is list of device supported by this apps is : 
  • Huawei
    • Huawei Pulse Mini
    • Huawei Pulse 
    • Huawei Ascend
    • Huawei U8220/U8230
    • Huawei Ascend 2 (M865)
  • Dell
    • Dell Streak
  • Commtiva
    • Commtiva Z71 (Boston, Blaze, and more)
    • Commtiva Link N700, 
    • Commtiva Spice MI700
  • Geeksphone
    • Geeksphone ONE
  • Micromax
    • Micromax A70
  • Samsung
    • Samsung Galaxy S2 (T-Mobile)
    • Samsung Galaxy Tab 8.9 (AT&T)
    • Samsung Galaxy S Blaze 4G
  • LG
    • LG Connect 4G MS840
    • LG Lucid VS840
    • LG Spectrum 4G
    • LG Revolution 4G
    • LG Esteeem 4G
    • LG Optimus M+
  • If your device not listed above, you should abort this task.
  • After you confirm phone model, now confirm version of your custom recovery

    • ClockworkMod 2.x
    • ClockworkMod 3.x+
  • Then download your custom recovery
  • When finish you must reboot your android device.
  • If you successfully installed custom recovery, you will see recovery already installed on your android system.
    Install CWM and TWRP Recovery
    Install CWM and TWRP Recovery 
  • Finish, your android device is installed custom recovery now.
  • [Guide] Hard Reset Samsung Galaxy Z3 (Z300H/DD INDIA) To Restore Factory Setting & Forgot Pattern/PIN/Password.

    [Guide] Hard Reset Samsung Galaxy Z3 (Z300H/DD INDIA) To Restore Factory Setting & Forgot Pattern/PIN/Password.

    Hard Reset Samsung Galaxy Z3 (Z300H/DD INDIA). This device is released on October, 2015. And today's guidebelajar will explain to you how to perform hard reset on Samsung Galaxy Z3 (Z300H/DD INDIA) smartphone. Please keep in mind, this tutorial will erase all data saved on your internal memory. Samsung Galaxy Z3 (Z300H/DD INDIA) is the smartphone with 5,0 Inchi TFT capacitive touchscreen, 16M colors, work on Tizen OS, v2.3, upgradable to v2.4, and supported with Processor Quad-core 1.3 GHz, Spreadtrum chipset, combined with 1 GB of RAM, 8 MP on primary camera and 5 MP on secondary camera to capture best moment and make a selfie on your life.

    Most of Android user say that Hard reset process is call with master reset or factory reset. Many people asking why should we perform hard reset to our phone. The logical answer that can I say for this asking is :
    • We want to remove all personal data and setting that was stored in Samsung Galaxy Z3 (Z300H/DD INDIA).device.
    • Because we will sell our Samsung Galaxy Z3 (Z300H/DD INDIA) Android phones
    • There are many bug on Samsung Galaxy Z3 (Z300H/DD INDIA).
    • Our Samsung Galaxy Z3 (Z300H/DD INDIA) has been lagging and stuck on android logo, this call with bootloop.
    • We have forgotten on PIN or Patern Lock at Samsung Galaxy Z3 (Z300H/DD INDIA).
    • We will give our Samsung Galaxy Z3 (Z300H/DD INDIA) away to some one else, and we don't want that one know everything about our secret data, so we have to erase all data before back up it.
    • Samsung Galaxy Z3 (Z300H/DD INDIA) has a persistent problem that cannot be solved.
    • and many other reason.

    1st Method. Hard Reset Samsung Galaxy Z3 (Z300H/DD INDIA) Using Menu :

    1. Make sure your battery is fully charged, Recommended you have 80% of battery capacity
    2. Then Backup your Samsung Galaxy Z3 (Z300H/DD INDIA). See This Guide
    3. Go to menu: System Setting >
    4. Select Backup and Reset >
    5. Factory Data Reset > 
    6. Reset Phone
    7. Choose Erase everything to confirm that you already to perform hard reset on Samsung Galaxy Z3 (Z300H/DD INDIA)
    8. Samsung Galaxy Z3 (Z300H/DD INDIA) will continue to hard reset process to restore factory default.

    2nd Method. Hard Reset Samsung Galaxy Z3 (Z300H/DD INDIA) Using Hardware Keys:

    1. Make sure your battery is fully charged, we recommend that your battery has 80% power
    2. Always BackUp your important data that store in Samsung Galaxy Z3 (Z300H/DD INDIA). see this guide
    3. Turn Off your Samsung Galaxy Z3 (Z300H/DD INDIA) by hold and press Power Button for a second.
    4. Release any SIM card and SD card that was installed on your Samsung Galaxy Z3 (Z300H/DD INDIA) smartphone.
    5. Then press and hold together a combination button Volume Up + Home Button + Power button   at same time for a seconds.
    6. Hard Reset Samsung Galaxy Z3 (Z300H/DD INDIA)
      Hard Reset Samsung Galaxy Z3 (Z300H/DD INDIA)
    7. Then you will see Samsung Logo on screen.
    8. When Android Logo appear on your screen. You must release all button.
    9. And now you will enter, Android System Recovery.
    10. Scroll down using Power Down button, and you can select "wipe data/factory reset" and confirm it using Power Button.
    11. Then select  "Yes--delete all user data". use volume down button to choice menu, and again confirm it using Power Button.
    12. Now, wait the process untill you see data wipe complete appear on screen.
    13. After process finished you can select "Reboot System Now"
    14. You can wait a while for 
       Samsung Galaxy Z3 (Z300H/DD INDIA) to reboot system
    15. Done, your hard reset process success now.

    [Guide] Hard Reset Samsung Galaxy S5 NEO G903F (EUROPE); G903W (CANADA) To Restore Factory Setting & Forgot Pattern/PIN/Password.

    [Guide] Hard Reset Samsung Galaxy S5 NEO G903F (EUROPE); G903W (CANADA) To Restore Factory Setting & Forgot Pattern/PIN/Password.

    Hard Reset Samsung Galaxy S5 NEO G903F (EUROPE); G903W (CANADA). This device is released on August, 2015. And today's guidebelajar will explain to you how to perform hard reset on Samsung Galaxy S5 NEO G903F (EUROPE); G903W (CANADA) smartphone. Please keep in mind, this tutorial will erase all data saved on your internal memory. Samsung Galaxy S5 NEO G903F (EUROPE); G903W (CANADA) is the smartphone with 5,1 Inchi TFT capacitive touchscreen, 16M colors, work on Android OS, v5.1.1 (Lollipop), and supported with Processor Octa-core 1.6 GHz Cortex-A53, Exynos 7580 Octa chipset, combined with 2 GB of RAM, 16 MP on primary camera and 5 MP on secondary camera to capture best moment and make a selfie on your life.

    Most of Android user say that Hard reset process is call with master reset or factory reset. Many people asking why should we perform hard reset to our phone. The logical answer that can I say for this asking is :
    • Our Samsung Galaxy S5 NEO G903F (EUROPE); G903W (CANADA) has been lagging and stuck on android logo, this call with bootloop
    • Because we will sell our Samsung Galaxy S5 NEO G903F (EUROPE); G903W (CANADA) Android phones
    • There are many bug on Samsung Galaxy S5 NEO G903F (EUROPE); G903W (CANADA).
    • We want to remove all personal data and setting that was stored in Samsung Galaxy S5 NEO G903F (EUROPE); G903W (CANADA).device.
    • We have forgotten on PIN or Patern Lock at Samsung Galaxy S5 NEO G903F (EUROPE); G903W (CANADA).
    • We will give our Samsung Galaxy S5 NEO G903F (EUROPE); G903W (CANADA) away to some one else, and we don't want that one know everything about our secret data, so we have to erase all data before back up it.
    • Samsung Galaxy S5 NEO G903F (EUROPE); G903W (CANADA) has a persistent problem that cannot be solved.
    • and many other reason.

    1st Method. Hard Reset Samsung Galaxy S5 NEO G903F (EUROPE); G903W (CANADA) Using Menu :

    1. Make sure your batery is fully charged, Recomended you have 80% of battery capacity
    2. Then Backup your Samsung Galaxy S5 NEO G903F (EUROPE); G903W (CANADA). See This Guide
    3. Go to menu: System Setting >
    4. Select Backup and Reset >
    5. Factory Data Reset >
    6. Reset Phone
    7. Choose Erase everything to confirm that you already to perform hard reset on Samsung Galaxy S5 NEO G903F (EUROPE); G903W (CANADA)
    8. Samsung Galaxy S5 NEO G903F (EUROPE); G903W (CANADA) will continue to hard reset process to restore factory default.

    2nd Method. Hard Reset Samsung Galaxy S5 NEO G903F (EUROPE); G903W (CANADA) Using Hardware Keys:

    1. Make sure your battery is fully charged, we recommend that your battery has 80% power
    2. Always BackUp your important data that store in Samsung Galaxy S5 NEO G903F (EUROPE); G903W (CANADA). see this guide
    3. Turn Off your Samsung Galaxy S5 NEO G903F (EUROPE); G903W (CANADA) by hold and press Power Button for a second.
    4. Release any SIM card and SD card that was installed on your Samsung Galaxy S5 NEO G903F (EUROPE); G903W (CANADA) smartphone.
    5. Then press and hold together a combination button Volume Up + Home Button + Power button   at same time for a seconds.
      Hard Reset Samsung Galaxy S5 NEO G903F (EUROPE); G903W (CANADA)
      Hard Reset Samsung Galaxy S5 NEO G903F (EUROPE); G903W (CANADA)
    6. Then you will see Samsung Logo on screen.
    7. When Android Logo appear on your screen. You must release all button.
    8. And now you will enter, Android System Recovery.
    9. Scroll down using Power Down button, and you can select "wipe data/factory reset" and confirm it using Power Button.
    10. Then select  "Yes--delete all user data". use volume down button to choice menu, and again confirm it using Power Button.
    11. Now, wait the process untill you see data wipe complete appear on screen.
    12. After process finished you can select "Reboot System Now"
    13. You can wait a while for 
       Samsung Galaxy S5 NEO G903F (EUROPE); G903W (CANADA) to reboot system
    14. Done, your hard reset process success now.

    Guide to make Bootable USB flash disk using HP USB key utility for windows.

    Guide to make Bootable USB flash disk using HP USB key utility for windows.

    Make Bootable USB flash disk. On this guide guidebelajar will show to you how to make Bootable USB flash disk using HP USB key utility for windows. this flash disk is used to boot on HP proliant server variant. If you confuse to burn image or ISO to boot on your computer to media drive like flash disk, for the best recomended you can use HP USB Key Utility for Windows. This is free tool from HP (hewlett packard) you can download from official HP site or from the other alternatif link below.

    HP USB Key Utility for Windows is a Windows application that will allow you to copy the ISO and CD contents to a USB flash disk using HP SmartStart CD, HP Firmware Maintenance CD, HP Smart Update Firmware DVD, HP Intelligent Provisioning, HP Service Pack for ProLiants. Users may then run the ISO and CD applications from a USB key. This is small windows application, only 1,4 MB. and the file name for HP USB Key Utility for Windows is cp015352.exe 

    Prerequisites to make Bootable USB flash disk.

    1. To run this utility program you must run one of this operating system.
        • Microsoft Windows 2000
          • Microsoft Windows Server 2003
            • Microsoft Windows Server 2003 for 64-bit Extended Systems
              • Microsoft Windows Server 2008 W32
                • Microsoft Windows Server 2008 x64
                  • Microsoft Windows Server 2008 Small Business
                    • Microsoft Windows Server 2008 Essential Business
                      • Microsoft Windows Server 2008 R2
                        • Microsoft Windows Server 2008 Foundation Edition.
                      1. Download  HP USB Key
                        • from official HP website. Here 
                        • http://h20564.www2.hpe.com/hpsc/swd/public/detail?swItemId=MTX_2aa85604194243afbdb1c29a34#tab2
                        • From mirror link.
                          • Version 1.7.0.0  
                          • https://drive.google.com/file/d/0B2I5z1mFfUpcUHlMZXR3TDllUEk/view?usp=sharing
                          • Version 2.0.0.0 
                          • https://drive.google.com/file/d/0B2I5z1mFfUpcbU5RZVRkeVotRTg/view?usp=sharing
                      2. Download ISO file for HP Proliant server. You can download one of this ISO file to make your USB flash disk bootable.
                        • HP SmartStart CD
                        • HP Firmware Maintenance CD
                        • HP Smart Update Firmware DVD
                        • HP Intelligent Provisioning, 
                        • Offline HP Smart Storage Administrator (HP SSA) Here 
                        • http://h20564.www2.hpe.com/hpsc/swd/public/detail?swItemId=MTX_fac66a01809546579a9c3fd050
                        • HP Service Pack for ProLiants. (SPP)
                          • for latest SPP you can download this link.
                          • or select the SPP version here

                      Guide to make Bootable USB flash disk using HP USB key utility for windows.

                      On this guide we will use HP Service Pack for ProLiants (SPP) and make USB flash disk Bootable drive. Now, follow this guide carefully to make your USB flash disk Bootable.
                      1. Launch HP USB Key installer on the appropriate operating system.
                      2. And now you will see HP package setup window on your screen.
                        HP package setup window
                        HP package setup window
                      3. Just click install to install this utility on your windows computer.
                      4. Follow on screen instruction until finish. If you don't see anything wrong it's mean your setup is going smoothly.
                      5. Once finish, you will see HP USB Key Utility appear on your Start menu.
                        HP USB Key Utility appear on your Start menu
                        HP USB Key Utility appear on your Start menu
                      6. Click HP USB Key Utility to run this program, and you will see this window on your screen.
                        HP USB Key Utility
                        HP USB Key Utility
                      7. Now click Next.
                      8. Then select Agree radio button on HP USB Key Utility end user license agreement window.
                        HP USB Key Utility end user license agreement
                        HP USB Key Utility end user license agreement
                      9. Click Next.
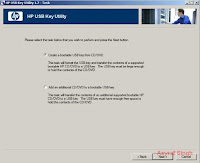
                      10. On the next window you must decide your task. there are two option on this task 
                        • Create a bootable USB key from CD/DVD
                        • Add an additional CD/DVD to a bootable USB key.
                          Create a bootable USB key from CD/DVD
                          Create a bootable USB key from CD/DVD
                      11. For a new bootable USB flash disk, you must select, Create a bootable USB key from CD/DVD.
                      12. Then click Next
                      13. Now you will see this window. You must insert the USB key and supported HP CD/DVD
                        HP USB Key Utility
                        HP USB Key Utility
                      14. Now, click Next.
                      15. Now, you will see select media window. on this window you must select option on radio button :
                        • Select CD/DVD drive. Select this if you want to make a bootable USB flash disk from CD/DVD source.
                        • Browse for ISO file : select this if you want to load your ISO file saved on your local computer.
                          select media - HP USB Key Utility
                          select media - HP USB Key Utility
                      16. Then choose the drive letter of the target USB key.
                      17. Now click next to start make Bootable USB flash disk using HP USB key utility for windows.
                      18. Wait the process until finish.
                      19. It take a long time depending your ISO file size.
                      20. Finish.
                      Note : to make a bootable USB flash disk from newest and Big ISO file you must use the latest USB Key Utility

                      [Guide] Hard Reset Samsung Galaxy J1 ACE To Fix Error, Forgotten PIN/Pattern/Password.

                      [Guide] Hard Reset Samsung Galaxy J1 ACE To Fix Error, Forgotten PIN/Pattern/Password.

                      Hard Reset Samsung Galaxy J1 ACE. This device is released on September, 2015. And today's guidebelajar will explain to you how to perform hard reset on Samsung Galaxy J1 ACE smartphone. Samsung Galaxy J1 ACE is the smartphone with 4,3 Inchi Super AMOLED capacitive touchscreen, 16M colors, work on Android OS, v4.4.4 (KitKat), and supported with Processor Quad-core 1.2 GHz, combined with 4 GB of RAM, 5 MP on primary camera and 2 MP on secondary camera. Some People say that Hard reset process is call with master reset or factory reset. Many people asking why shoud we perform hard reset to our phone. The logical answer that can I say for this asking is :
                      • Samsung Galaxy J1 ACE has a persistent problem that cannot be solved
                      • We will give our Samsung Galaxy J1 ACE away to some one else, and we don't want that one know everything about our secret data, so we have to erase all data before back up it.
                      • Our Samsung Galaxy J1 ACE has been lagging and stuck on android logo, this call with bootloop
                      • There are many bug on Samsung Galaxy J1 ACE.
                      • We want to remove all personal data and setting that was stored in Samsung Galaxy J1 ACE.device.
                      • We have forgotten on PIN or Patern Lock at Samsung Galaxy J1 ACE..
                      • Because we will sell our Samsung Galaxy J1 ACE Android phones
                      • and many other reason.

                      1st Method. Hard Reset Samsung Galaxy J1 ACE Using Menu :

                      1. Make sure your batery is fully charged, Recomended you have 80% of battery capacity
                      2. Then Backup your Samsung Galaxy J1 ACE. See This Guide
                      3. Go to menu: System Setting >
                      4. Select Backup and Reset >
                      5. Factory Data Reset > 
                      6. Reset Phone.
                      7. Choose Erase everything to confirm that you already to perform hard reset on Samsung Galaxy J1 ACE
                      8. Samsung Galaxy J1 ACE will continue to hard reset process to restore factory default.

                      2nd Methode. Hard Reset Samsung Galaxy J1 ACE Using Hardware Keys:

                      1. Make sure your battery is fully charged, we recomended that your battery has 80% power
                      2. Always BackUp your important data that store in Samsung Galaxy J1 ACE. see this guide
                      3. Turn Off your Samsung Galaxy J1 ACE by hold and press Power Button for a second.
                      4. Release any SIM card and SD card that was installed on your Samsung Galaxy J1 ACE smartphone.
                      5. Then press and hold together a combination button Volume Up + Power button + Home Button at same time for a seconds.
                      6. Hard Reset Samsung Galaxy J1 ACE
                        Hard Reset Samsung Galaxy J1 ACE
                      7. Release all button when your phone vibrate and you will see Samsung and Android Logo on your screen. You must wait this logo for a few second.
                      8. And now you will enter, Android System Recovery.
                      9. Scroll down using Power Down button, and you can select "wipe data/factory reset" and confirm it using Power Button.
                      10. Then select  "Yes--delete all user data". use volume down button to choice menu, and again confirm it using Power Button.
                      11. Now, wait the process until you see data wipe complete appear on screen.
                      12. After process finished you can select "Reboot System Now"
                      13. You can wait a while for 
                         Samsung Galaxy J1 ACE to reboot system
                      14. Done, your hard reset process success now.

                      الجمعة، 29 ديسمبر 2017

                      Guide To Root And Unlock Bootloader Motorola Droid Turbo Without PC Using KingRoot And SunShine App.

                      Guide To Root And Unlock Bootloader Motorola Droid Turbo Without PC Using KingRoot And SunShine App.

                      Unlock Bootloader Motorola Droid. There are many way to Unlock Bootloader on Android device. And now, guidebelajar will share to you how to unlock bootloader on android motorolla Droid Turbo smartphone without PC or computer using SunShine App, but this is not free App. By unlocking bootloader on the Motorola Droid Turbo device it's possible to install new custom ROM like ClockworkMod (CWM) or TWRP recovery on Motorola Droid Turbo device. When you install custom recovery you will be able to root your Motorola device. This is not recommended task to unlock bootloader for a basic user, because when your motorola Droid Turbo device is unlocking will erase everything on your phone. (data, musics, Photos, videos, SMS, and contacts). So, you must backup all data, and you will lost any guarantee too.

                      Motorola Droid Turbo comes with 5,2 Inches wide Super AMOLED capacitive touchscreen, 16M colors, work on Android OS, v4.4.4 (KitKat), upgradable to v5.1 (Lollipop), planned upgrade to v6.0 (Marshmallow) and supported, Processor Quad-core 2.7 GHz Krait 450, Chipset Qualcomm Snapdragon 805,  combined with 3 GB of RAM as their engine. And you can enjoy exciting 21 MP on main camera, and 2 MP on secondary camera. And this devices released 2014, October.

                      Now, follow this guide step by step to Root And Unlock Bootloader Motorola Droid Turbo Without PC Using KingRoot And SunShine App.

                      Prerequisite.

                      1. Download and install the latest Kingroot (Here)
                      2. http://kingroot.net/
                      3. Download SunShine 3.2 BETA for DroidTurbo Only (Here)
                      4. http://theroot.ninja/apks/SunShine32DroidTurbo.apk
                        • SunShine is not free apps, you must buy the license code to activate this apps for full usage.

                      Root Motorola Droid Turbo.

                      Before you Unlock Bootloader Motorola Droid Turbo, your device must on rooted status, this is very easy task to root your Motorola Droid Turbo.
                      1. Run Kingroot Apps from your Apps drawer, kingroot is work perfectly on 5.1 SU4TL-44 with the matching 3.10.40-perf-g90ddf4a kernel, which this apps is free for use.
                        kernel version - Unlock Bootloader Motorola Droid Turbo
                        kernel version - Unlock Bootloader Motorola Droid Turbo
                      2. Wait for app to checking and verifying your Motorola Droid Turbo.
                        checking device - Unlock Bootloader Motorola Droid Turbo
                        checking device - Unlock Bootloader Motorola Droid Turbo
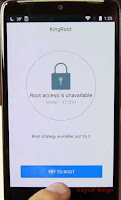
                      3. When root status is unavailable for your device, you can continue to tap Try to Root button.
                        try to root - Unlock Bootloader Motorola Droid Turbo
                        try to root - Unlock Bootloader Motorola Droid Turbo
                      4. Waiting for root process until finish, if failed you can try again.
                        root process - Unlock Bootloader Motorola Droid Turbo
                        root process - Unlock Bootloader Motorola Droid Turbo
                      5. When process is finished, you can see root successfully message on Motorola Droid Turbo screen.

                      Verify Root Status on Motorola Droid Turbo.

                      1. Download and install root checker from Google Play Store.
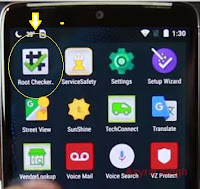
                      2. Now, you must see root checker apps icon appear on screen.
                      3. root checker - Unlock Bootloader Motorola Droid Turbo
                        root checker - Unlock Bootloader Motorola Droid Turbo
                      4. Run this Apps
                      5. Now, tap on the Verify Root Status
                      6. If your device successfully rooted, you will see "congratulation ! Root access is properly installed on this device!" message on screen
                        root checker - Unlock Bootloader Motorola Droid Turbo
                        root checker - Unlock Bootloader Motorola Droid Turbo

                      Guide Unlock Bootloader Motorola Droid Turbo.

                      1. Turn on your Motorola Droid Turbo
                      2. Make sure you have enough battery capacity, at least you have 80% of battery power. otherwise you can plug in charger on it.
                      3. This version requires your Motorola Droid Turbo on the Build Number 5.1 SU4TL-44 with the matching 3.10.40-perf-g90ddf4a kernel. you can Go to Setting - About Phone - Kernel version to check it.
                      4. Your Motorola Droid Turbo device must be on internet coverage area, for thus use WiFi Connection for faster internet speed.
                      5. Make sure your Motorola Droid Turbo device is rooted. 
                      6. Now, open SunShine Apps from your Motorola Droid Turbo App drawer.
                        sunshine apps - Unlock Bootloader Motorola Droid Turbo
                        sunshine apps - Unlock Bootloader Motorola Droid Turbo
                      7. Tap accept
                      8. Then, Tap Okay 
                      9. For next step, tap Continue
                      10. Now, wait for testing process 
                      11. If you see pop up message appear on screen, tap Allow
                      12. If you Passed ! message, it's mean your device has passed the pre test, is already and ready to do the compatibility test. now you can tap continue 
                      13. On this testing SunShine will determine if can unlock/s-off your phone. Sometimes this can take a several minutes.
                      14. If your device is passed the compatibility test, you will see Compatible ! message on your screen.
                      15. On this screen you will see three options, exit, code, buy
                      16. Because SunShine is not free Apps, you must buy this apps first.
                      17. Or you can input code to unlock this license.
                      18. If you success input code, you will be able to continue using this apps
                      19. Now, SunShine will unlocking your device , afterwards the Motorola Droid Turbo device will reboot and be unlocked.
                      20. After finish you will see the message "Warning Bootloader Unlocked"
                      21. Finish
                      22. If your device get stuck for more than five (5) minutes on the test, you can turn on the phone off, then check bootloader is unlocked.
                      23. If it is not unlocked, you can try this guide again .

                      Guide to configuring Dynamic HP Smart Array B120i RAID support On HP Proliant ML10 V2 server

                      Guide to configuring Dynamic HP Smart Array B120i RAID support On HP Proliant ML10 V2 server.

                      Configuring Dynamic HP Smart Array B120i RAID support. On this guide we will show to you how to enable Dynamic HP Smart Array B120i RAID support on Proliant ML10 V2 server. This is very simple task you can do to set up this server. You can enable it by entering BIOS sytem on this server. for most HP proliant you can use F9 key on keyboard to enter Bios system. Now follow this guide carefully.

                      Read this : How to  to install Windows Server 2012 R2 operating system on HP Proliant ML10 V2 server.

                      Enabling Dynamic HP Smart Array B120i RAID.

                      1. Start your Proliant ML10 V2 server by pressing Power button located in front of server body casing
                      2. Now, wait for initilizing process, it take 2-3 minute.
                        initilizing process - proliant ml10 v2
                        initilizing process - proliant ml10 v2
                      3. When you see F9 on your screen, hit this button on your keyboard to enter Setup. F9 located on left bottom on your screen.
                        enter bios - proliant ml10 v2
                        enter bios - proliant ml10 v2
                      4. Once you entering Setup on Proliant ML10 V2, now highlight System Options. (navigate using up and down arrow keyboard button, and enter to confirm your selection).
                      5. System options  - Proliant ML10 V2
                        System options  - Proliant ML10 V2
                      6. Then you will see next options, now highlight SATA Controller options and hit enter.
                        SATA Controller options - proliant ml10 v2
                        SATA Controller options - proliant ml10 v2
                      7. Now, hit enter to Enable Dynamic HP Smart Array B120i RAID Support.
                        Enable Dynamic HP Smart Array B120i RAID Support.
                        Enable Dynamic HP Smart Array B120i RAID Support.
                      8. Then you will see warning on your screen with red background and yellow text. Enabling RAID will result in data loss or data corruption on existing SATA drives. Please backup all drives before enabling this feature.
                      9. Enabling RAID will result in data loss or data corruption on existing SATA drives. Please backup all drives before enabling this feature.
                        Enabling RAID will result in data loss or data corruption on existing SATA drives. Please backup all drives before enabling this feature.
                      10. On the next screen you will see three options, 
                      11. Enable SATA legacy Support
                      12. Enable SATA AHCI Support
                      13. just select :  Enable Dynamic HP Smart Array B120i RAID support by pressing enter
                      14. Enable Dynamic HP Smart Array B120i RAID support
                        Enable Dynamic HP Smart Array B120i RAID support
                      15. Now back to home screen, then save and exit from HP Proliant ML10 V2 setup utility by pressing F10 button on your keyboard.
                        F10 save and exit from Proliant ML10 V2 setup
                        F10 save and exit from Proliant ML10 V2 setup
                      16. Finish, now you have successfully configuring Dynamic HP Smart Array B120i RAID support On HP Proliant ML10 V2 server.

                      الخميس، 28 ديسمبر 2017

                      [Guide] Hard Reset Samsung Galaxy ON7 SM-G600 AND ON5 SM-G550 To Restore Factory Setting & Forgot Pattern/PIN/Password.

                      [Guide] Hard Reset Samsung Galaxy ON7 SM-G600 AND ON5 SM-G550 To Restore Factory Setting & Forgot Pattern/PIN/Password.

                      Hard Reset Samsung Galaxy ON7 SM-G600 AND ON5 SM-G550. This device is released on October, 2015. And today's guidebelajar will explain to you how to perform hard reset on Samsung Galaxy ON7 SM-G600 AND ON5 SM-G550 smartphone. Spesification :

                      1. Samsung Galaxy ON7 SM-G600 is the smartphone with 5,5 Inchi TFT capacitive touchscreen, 16M colors, work on Android OS, v5.1 (Lollipop), and supported with Processor Quad-core 1.2 GHz, combined with 1,5 GB of RAM, 8 MP on primary camera and 5 MP on secondary camera. 
                      2. Samsung Galaxy ON5 SM-G550 is the smartphone with 5,0 Inchi TFT capacitive touchscreen, 16M colors, Exynos 3475 chipset, work on Android OS, v5.1 (Lollipop), and supported with Processor Quad-core 1.3 GHz Cortex-A7, Mali-T720 GPU, combined with 1,5 GB of RAM, 8 MP on primary camera and 5 MP on secondary camera. 

                      Some People say that Hard reset process is call with master reset or factory reset. Many people asking why shoud we perform hard reset to our phone. The logical answer that can I say for this asking is :
                      • Our Samsung Galaxy ON7 SM-G600 AND ON5 SM-G550 has been lagging and stuck on android logo, this call with bootloop
                      • Because we will sell our Samsung Galaxy ON7 SM-G600 AND ON5 SM-G550 Android phones
                      • There are many bug on Samsung Galaxy ON7 SM-G600 AND ON5 SM-G550.
                      • We want to remove all personal data and setting that was stored in Samsung Galaxy ON7 SM-G600 AND ON5 SM-G550.device.
                      • We have forgotten on PIN or Patern Lock at Samsung Galaxy ON7 SM-G600 AND ON5 SM-G550.
                      • We will give our Samsung Galaxy ON7 SM-G600 AND ON5 SM-G550 away to some one else, and we don't want that one know everything about our secret data, so we have to erase all data before back up it.
                      • Samsung Galaxy ON7 SM-G600 AND ON5 SM-G550 has a persistent problem that cannot be solved.
                      • and many other reason.

                      1st Method. Hard Reset Samsung Galaxy ON7 SM-G600 AND ON5 SM-G550 Using Menu :

                      1. Make sure your battery is fully charged, Recomended you have 80% of battery capacity
                      2. Then Backup your Samsung Galaxy ON7 SM-G600 AND ON5 SM-G550. See This Guide
                      3. Go to menu: System Setting >
                      4. Select Backup and Reset >
                      5. Factory Data Reset > 
                      6. Reset Phone
                      7. Choose Erase everything to confirm that you already to perform hard reset on Samsung Galaxy ON7 SM-G600 AND ON5 SM-G550
                      8. Samsung Galaxy ON7 SM-G600 AND ON5 SM-G550 will continue to hard reset process to restore factory default.

                      2nd Method. Hard Reset Samsung Galaxy ON7 SM-G600 AND ON5 SM-G550 Using Hardware Keys:

                      1. Make sure your battery is fully charged, we recommend that your battery has 80% power
                      2. Always BackUp your important data that store in Samsung Galaxy ON7 SM-G600 AND ON5 SM-G550. see this guide
                      3. Turn Off your Samsung Galaxy ON7 SM-G600 AND ON5 SM-G550 by hold and press Power Button for a second.
                      4. Release any SIM card and SD card that was installed on your Samsung Galaxy ON7 SM-G600 AND ON5 SM-G550 smartphone.
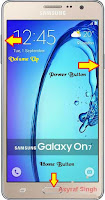
                      5. Then press and hold together a combination button Volume Up + Home Button + Power button   at same time for a seconds.
                      6. Hard Reset Samsung Galaxy ON7 SM-G600 AND ON5 SM-G550
                        Hard Reset Samsung Galaxy ON7 SM-G600 AND ON5 SM-G550
                      7. Release all button when you see this screen.
                      8. Then you will see Android Logo on your screen. You must wait this logo for a few second.
                      9. And now you will enter, Android System Recovery.
                      10. Scroll down using Power Down button, and you can select "wipe data/factory reset" and confirm it using Power Button.
                      11. Then select  "Yes--delete all user data". use volume down button to choice menu, and again confirm it using Power Button.
                      12. Now, wait the process until you see data wipe complete appear on screen.
                      13. After process finished you can select "Reboot System Now"
                      14. You can wait a while for 
                         Samsung Galaxy ON7 SM-G600 AND ON5 SM-G550 to reboot system
                      15. Done, your hard reset process success now.

                      Guide To Install Cyanogenmod 13 ROM for LG G4 (H815).

                      Guide To Install Cyanogenmod 13 ROM for LG G4 (H815).

                      Install Cyanogenmod 13 ROM for LG G4 (H815). On this guide guidebelajar  will share to you how to install Install Cyanogenmod 13 ROM for LG G4 (H815). This is open source firmware that distributed for smartphone and tablet based on Android operating system, by using Cyanogenmod fimrware you will  get the features and options not found in the official firmware that distributed by vendors of  LG G4 (H815) devices.

                      LG G4 (H815) comes with 5,5 Inches wides IPS LCD capacitive touchscreen, 16M colors, work on Android OS, v5.1 (Lollipop) and supported Qualcomm MSM8992 Snapdragon 808 chipset, Processor Quad-core 1.44 GHz Cortex-A53 & dual-core 1.82 GHz Cortex-A57, Adreno 418 GPU combined with 3 GB of RAM as their engine. And you can enjoy exciting 16 MP on main camera, and 5 MP on secondary camera. And this devices released 2015, April.

                      On this guide guidebelajar use unofficial Cyanogenmod 13 rom for LG G4 (H815) based on android marshmallow 6.0, So, if your LG G4 (H815) still using Android 5.1 Lollipop, you must upgrade to marshmallow first, You can see this guide
                      http://guidebelajar.blogspot.com/2015/11/guide-to-install-stock-android-6.0-Marshmallow-LG-G4.html
                      to update LG G4 (H815), and you can download this firmware on avaliable link below. To apply this guide, make sure that your LG G4 (H815) is using android lollipop 5.1.1 update, also your device must installed TWRP recovery.

                      Download Cyanogenmod.

                      To perform this installation you must need to download requirement firmware.
                      1. Download this Cyanogenmod 13 firmware. Here 
                      2. https://download.cyanogenmod.org/?device=h815
                      3. Download the latest GAPPS for Android MArshmallow, Here 
                      4. http://www.gammerson.com/2015/09/download-gapps-for-andorid-marhsmallow.html

                      Installation Guide.

                      1. You must download all requirement file above 
                      2. Make sure you have ADB installed on your computer. or you can see here how to installed.
                      3. https://wiki.cyanogenmod.org/w/Adb
                      4. Then, Copy and paste the Cyanogenmod rom and gapps zip file to sd card, Put it on the root of  :
                        • /sdcard
                      5. If you are not already in recovery, boot  your LG G4 (H815) to recovery mode now. How to enter it :
                        • Press and Hold Vol Up, Home & Power button.
                      6. Now, In (TWRP) Team Win Recovery Project, select menu choices by tapping on the appropriately labelled button.
                        Install Cyanogenmod 12.1 (Cm 12.1) ROM for Samsung Galaxy E5
                        Install Cyanogenmod 13 ROM for LG G4 H815
                      7. We recomended you to select Backup Button to create a backup
                      8. Then, select wipe button, And then select Factory Reset.
                      9. Then select Install
                      10. Then, Navigate to /sdcard and select the CyanogenMod .zip package.
                      11. Now, follow instruction shown on the screen to install the package on LG G4 (H815)
                      12. if you are installing multiple packages (GAPPS), you must install CyanogenMod the first and then install any subsequent packages on top of it
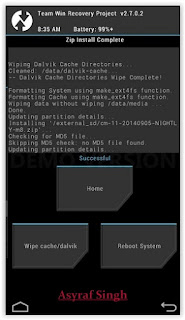
                      13. When Zip installation complete, Now Clear cache and Clear Data. 
                        Install Cyanogenmod 12.1 (Cm 12.1) ROM for Samsung Galaxy E5
                        Install Cyanogenmod 13 ROM for LG G4 H815
                      14. Once Zip installation has finished, you can return to the main menu and select Reboot, then System
                      15. The LG G4 (H815) device will now boot into CyanogenMod.

                      الأربعاء، 27 ديسمبر 2017

                      Guide To Flash Or Install Stock Firmware On Android Motorola Moto G (3rd Gen).

                      Guide To Flash Or Install Stock Firmware On Android Motorola Moto G (3rd Gen).

                      Install Stock Firmware On Android Motorola Moto G (3rd Gen). This guide is help you to flash or install a new firmware on Motorola Moto G (3rd Gen), this smartphone is using android operating system as their OS, we know that android is famous known for it's capability for customization, flexibility and free development community. Why android called flexibility operating system, because we can access and install to millions of free apps without the cost, and we can customize the ROM, we have freedom for use this operating system without pay license, and we can get root privilege. By rooting, we will get an access on your device, we can take control of the system files and modify them to achieve the desired goals.

                      Guidebelajar on this guide will explain to you how to flashing android device on Motorola Moto G (3rd Gen) with easy and simple step, Motorola Moto G (3rd Gen) comes with 5,0 Inches wides IPS LCD capacitive touchscreen, 16M colors, work on Android OS, v5.1.1 (Lollipop), planned upgrade to v6.0 (Marshmallow) and supported with rade to v6.0 (Marshmallow) Chipset chipset, Processor Quad-core 1.4 GHz Cortex-A53, GPU Adreno 306, combined with 2 GB of RAM as their engine. And you can enjoy exciting 13 MP on main camera, and 5 MP on secondary camera. And this devices released 2014, November.

                      This is some reason why you should flash or install a new firmware on your Motorola Moto G (3rd Gen)
                      1. You can flash your android device if it get bootloop or when you failed to install Stock ROM Mod
                      2. If you want to revert back to Stock Rom from any custom roms Like CM 12,Pac rom,Resurrection remix  remix,Slim Lp.
                      3. If your android device is still under warranty, you can take it to a service center. because you will get low risk from damage or dysfunction of this device and you will get free charge.
                      4. If your device is out of the warranty period, you can try this options.
                        • If you are not experienced in android flash, the best advice is take your android device to official service center to get original flash ROM
                        • If you want to try it your self, you can follow this guide step by step To Flash Or Install Stock Firmware On Android Motorola Moto G (3rd Gen), but guidebelajar is not responsible for all the risks thereafter.

                      Download Required File For Flash Motorola Moto G (3rd Gen).

                      Download all needed file for flash Motorola Moto G (3rd Gen) below.
                      1. Motorola USB Drivers
                        • Here  
                        • If you windows 10 user, you must need to download and install Media Feature Pack for N and KN versions of Windows 10.  Download here  
                      2. Then, Latest Fastboot | ADB (Windows | Linux)
                      3. Original Stock or Factory Fimware Images.
                        • This stock only work on this device variant (XT1540  , XT1541 , XT1542 , XT1543 , XT1544 , XT1548 , XT1550 Motorola Moto G 3rd generation)
                        • Included both for 1GB and 2 GB variants. 

                      Guide To Flash Motorola Moto G (3rd Gen).

                      Now, follow this guide step by step to flash Motorola Moto G (3rd Gen)
                      1. First thing you need is download the stock firmware file for your Motorola Moto G (3rd Gen) from above.
                      2. After finish download this file, extract zip for chosen Firmware Image to a folder with a simple directory structure. 
                        • For example: C:\motog_firmware\
                      3. Then, Extract the adb-fastboot-latest_win_linux.zip into this folder.

                      Reboot Motorola Moto G (3rd Gen) into Bootloader Mode.

                      Now we proceed to reboot our Motorola Moto G (3rd Gen), there are two method we can use to reboot this device.
                      1. Reboot Motorola Moto G (3rd Gen) using hardware button.
                        • Unplug the USB cable from the computer
                        • Then power off Motorola Moto G (3rd Gen) the phone.
                        • When your phone off, now press and hold 'Volume down button' then power on the phone.
                        • Finally, connect USB cable to your computer.
                      2. Reboot Motorola Moto G (3rd Gen) using Software menu.
                        • First you need is enable developer mode on the Motorola Moto G (3rd Gen) 
                        • Go to (Settings-> 'About Phone')
                        • Now, Tap 7 times on 'Build Number'
                        • How to Enable USB debugging. ?
                          • Go to Settings -> 
                          • Developer options -> 
                          • Then tap USB Debugging.
                        • Then, Connect phone to computer via USB cable, you should see a new ADB device detected and drivers installed.
                        • Now, Open Command Prompt or Terminal, you can navigate to the Firmware / ADB folder
                          • For example: C:\motog_firmware\
                        • Then type : 
                          • adb reboot-bootloader

                      Enter Fastboot Command to Flash Motorola Moto G (3rd Gen).

                      Now, we still on command prompt, then input commands manually, one at a time then confirm with press enter. And then checking that each one returns no error.
                      • fastboot flash partition gpt.bin
                      • fastboot flash bootloader bootloader.img
                      • fastboot flash logo logo.bin
                      • fastboot flash boot boot.img
                      • fastboot flash recovery recovery.img
                      • fastboot flash system system.img_sparsechunk.0
                      • fastboot flash system system.img_sparsechunk.1
                      • fastboot flash system system.img_sparsechunk.2
                      • fastboot flash system system.img_sparsechunk.3
                      • fastboot flash system system.img_sparsechunk.4
                      • fastboot flash system system.img_sparsechunk.5
                      • fastboot flash modem NON-HLOS.bin
                      • fastboot erase modemst1 
                      • fastboot erase modemst2 
                      • fastboot flash fsg fsg.mbn
                      • fastboot erase cache 
                      • fastboot erase userdata
                      • fastboot reboot
                      Now, your Motorola Moto G (3rd Gen) will reboot, when ready to use, your phone is successfully installed new firmware. Finish.

                        Guide to update Lenovo A2010 using OTA zip file.

                        Guide to update Lenovo A2010 using OTA zip file.

                        Update Lenovo A2010 OTA zip file. This guide will help you to update your Android Lenovo A2010 using official OTA zip file. Lenovo A2010 is the smartphone with 4,5 Inchi wide LCD, work on Android OS, v5.1 (Lollipop) and suppoerted with Mediatek MT6735M, Quad-core 1 GHz CPU, GPU Mali-T720, combined with 1 GB of RAM and 5 MP of main camera, and 2 MP on secondary camera. 

                        On this guide required TWRP or CWM recovery installed on your Lenovo A2010, this recovery is used for installing custom roms and then for some other reason you reverted back to stock rom on your device (for backup). And now guidebelajar have a simple method to install OTA zip file on Android Lenovo A2010. Just follow the steps below and download the requirement file and flash it on your device and then flash the OTA Update.

                        Prerequisites to update Lenovo A2010 OTA zip file.

                        1. This guide only for Lenovo A2010 not for Lenovo A2010 Plus
                        2. Lenovo A2010 must rooted, see this guide to root Lenovo A2010. Here
                        3. Make sure TWRP or CWM recovery installed correctly on your Lenovo A2010 devices. for more detail instruction, see below.
                          • Guide to install TWRP without PC. Here  
                          • Guide to install CWM on Lenovo A2010. Here  
                        4. Download Lollipop 5.5.2 OTA Zip file. Here  

                        How to install OTA update ?

                          First method.

                          • Make sure your Lenovo A2010 is rooted.
                          • Now, put your OTA update file to your SD card
                          • Then switch off your android phone
                          • Then enter your phone to system recovery / recovery mode. how to do it ?
                            • Press and hold Power button and Volume Up.  
                              enter recovery mode lenovo a2010
                              enter recovery mode lenovo a2010
                          • Release all button when you see select boot mode  screen.
                            select boot mode - lenovo a2010
                            select boot mode - lenovo a2010
                          • Use the volume up button to navigate menu item on boot mode and select recovery by pressing the Volume Down button to confirm.
                          • Then you will see Android logo appear on your Lenovo A2010 screen.
                            android logo - lenovo a2010
                            android logo - lenovo a2010
                          • When you see this screen, now, press and hold volume Up and power button to enter recovery mode on Lenovo A2010.
                            • enter recovery mode - lenovo a2010
                              enter recovery mode - lenovo a2010
                        Now, you have successfully enter recovery mode on Android Lenovo A2010 device.
                          recovery mode on Android Lenovo A2010
                          recovery mode on Android Lenovo A2010 
                        To update your Android Lenovo A2010 via OTA update Zip file, now select apply update from sdcard.
                          apply update from sdcard
                          apply update from sdcard

                          1. then browse your OTA zip file
                          2. Wait the process 
                          3. Once finish reboot your Lenovo A2010 devices.
                          4. Ok

                        2nd Method.


                      1. If the first method doesn't work on your Android Lenovo A2010 device, you can try on manuall method.
                      2. Copy ZIp file to SD card
                      3. Switch on your Lenovo A2010
                      4. Go to setting
                        settings
                        settings
                      5. And then Go to About phone
                        about phone
                        about phone
                      6. then software updates
                        software updates
                        software updates
                      7. click on  the leftmost capacitive button 
                      8. Then you can click toolkit
                      9. Then click on the first option install update from sdcard by a zip file.
                        install update from sdcard by a zip file
                        install update from sdcard by a zip file
                      10. Now select your zip file from SD card.
                      11. It will reboot the Lenovo A2010 phone into recovery and ask you to select the zip file 
                      12. In the recovery mode you can use volume up and volume down to navigate menu, an use power button to confirm the selected menu.
                      13. Now, select zip file you want to install
                      14. Just wait the process untill complete, it take 10 - 15 minute
                      15. Once update complete, it's recomended for you to perform hard reset / factory reset on your Lenovo A2010 android device.
                      16. finish